Navigating the macOS Terminal efficiently can significantly enhance your productivity, especially when working with file systems and scripts. One of the most useful techniques is launching Terminal directly from the current folder location in Finder. This eliminates the need to manually navigate to the folder using Terminal commands, saving time and effort.
Using Finder’s Contextual Menu
The Finder’s contextual menu provides a straightforward way to open Terminal in the current folder location. This method is ideal for users who prefer graphical interfaces over command-line operations. Follow these steps:
- Open Finder and navigate to the folder where you want to launch Terminal.
- Right-click (or Control-click) on the folder to open the contextual menu.
- Select Services from the menu, then choose New Terminal at Folder.
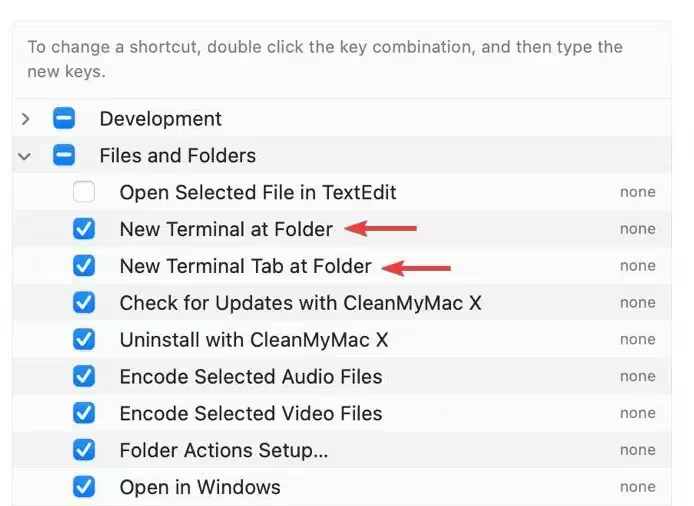
If the New Terminal at Folder option is not visible, you may need to enable it in System Preferences. Navigate to System Settings > Keyboard > Shortcuts > Services and ensure that New Terminal at Folder is checked.
Using Keyboard Shortcuts
For users who prefer keyboard shortcuts, macOS offers a quick way to open Terminal in the current folder location. This method is particularly useful for power users who want to minimize mouse usage. Here’s how:
- Open Finder and select the folder where you want to launch Terminal.
- Press Command + Shift + C to copy the folder’s path.
- Open Terminal and type cd , then paste the folder path using Command + V.
- Press Enter to navigate to the folder.
This method is efficient but requires a few extra steps compared to the contextual menu approach.
Using Third-Party Applications
If you frequently need to open Terminal in specific folder locations, third-party applications can streamline the process. Tools like iTerm2 or TermHere provide enhanced functionality and customization options. Here’s how to use them:
- Download and install a third-party Terminal application like iTerm2 or TermHere.
- Configure the application to integrate with Finder’s contextual menu.
- Right-click on a folder in Finder and select the application’s option to open Terminal at that location.
These applications often include additional features such as tabbed interfaces, split panes, and advanced scripting capabilities, making them ideal for advanced users.
Automating the Process with Scripts
For users comfortable with scripting, automating the process of opening Terminal in the current folder location can save significant time. You can create a custom script using AppleScript or shell scripting. Here’s an example using AppleScript:
tell application "Finder"
    set currentFolder to (quoted form of POSIX path of (target of front window as alias))
    tell application "Terminal"
        do script "cd " & currentFolder
        activate
    end tell
end tell
Save this script as an application or assign it to a keyboard shortcut for quick access.
Enhancing Productivity with Terminal Shortcuts
Mastering Terminal shortcuts can further enhance your productivity. For example, using Command + T opens a new tab in Terminal, while Command + K clears the screen. Combining these shortcuts with the methods above can create a seamless workflow.
Additionally, customizing your Terminal profile with aliases and functions can reduce repetitive tasks. For instance, you can create an alias to navigate to frequently used directories with a single command.
Troubleshooting Common Issues
If you encounter issues while trying to open Terminal in the current folder location, ensure that the necessary permissions are granted. For example, some folders may require administrative privileges to access. Additionally, verify that the New Terminal at Folder service is enabled in System Settings.
If using third-party applications, ensure they are compatible with your macOS version. Updating the application or macOS itself can often resolve compatibility issues.


