Securing your Mac is essential to protect your data, privacy, and system integrity. With the increasing prevalence of cyber threats, taking proactive measures to safeguard your device is no longer optional
Enable FileVault for Full Disk Encryption
FileVault is a built-in macOS feature that encrypts your entire disk, ensuring that your data remains inaccessible to unauthorized users. To enable FileVault:
- Go to System Settings > Privacy & Security > FileVault.
- Click Turn On FileVault.
- Choose to store your recovery key with Apple or create a local key.
Once enabled, your Mac will encrypt all data on the disk, including system files and user data. This ensures that even if your device is lost or stolen, your information remains secure.
Install Reliable Antivirus Software
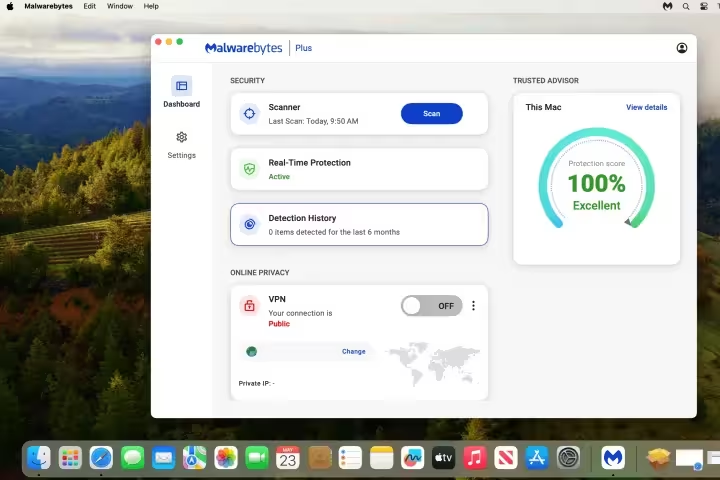
While macOS is known for its robust security, it is not immune to malware. Installing a reputable antivirus solution adds an extra layer of protection. Look for software that offers real-time scanning, malware removal, and phishing protection. Some popular options include:
- Malwarebytes: Lightweight and effective for detecting and removing malware.
- Norton 360: Comprehensive protection with additional features like a VPN and password manager.
- Bitdefender: Known for its minimal impact on system performance.
Regularly update your antivirus software to ensure it can detect the latest threats.
Harden Your System Configuration
System hardening involves configuring your Mac to minimize vulnerabilities. Follow these steps to enhance your system’s security:
- Enable the Firewall: Go to System Settings > Network > Firewall and turn it on. This prevents unauthorized network access.
- Disable Automatic Login: Navigate to System Settings > Users & Groups and ensure automatic login is turned off.
- Limit App Permissions: Review and restrict app access to sensitive data like your camera, microphone, and location.
These measures reduce the attack surface and make it harder for malicious actors to exploit your system.
Keep Your macOS Updated
Apple regularly releases updates to address security vulnerabilities and improve system performance. To ensure your Mac is up to date:
- Go to System Settings > General > Software Update.
- Enable Automatic Updates to install security patches as soon as they are available.
Running the latest version of macOS ensures you benefit from the most recent security enhancements.
Use Strong Passwords and Two-Factor Authentication
Weak passwords are a common entry point for attackers. Follow these best practices:
- Create passwords with at least 12 characters, including uppercase, lowercase, numbers, and symbols.
- Use a password manager to generate and store unique passwords for each account.
- Enable Two-Factor Authentication (2FA) for your Apple ID and other critical accounts.
2FA adds an extra layer of security by requiring a second form of verification, such as a code sent to your phone.
Regularly Back Up Your Data
Backups are a critical component of any security strategy. Use Time Machine to create regular backups:
- Connect an external drive to your Mac.
- Go to System Settings > General > Time Machine and select the drive.
- Enable Automatically Back Up to ensure your data is consistently saved.
In the event of a security breach or hardware failure, you can restore your data from the backup.
Bonus: Use Hot Corners to Instantly Lock your Mac
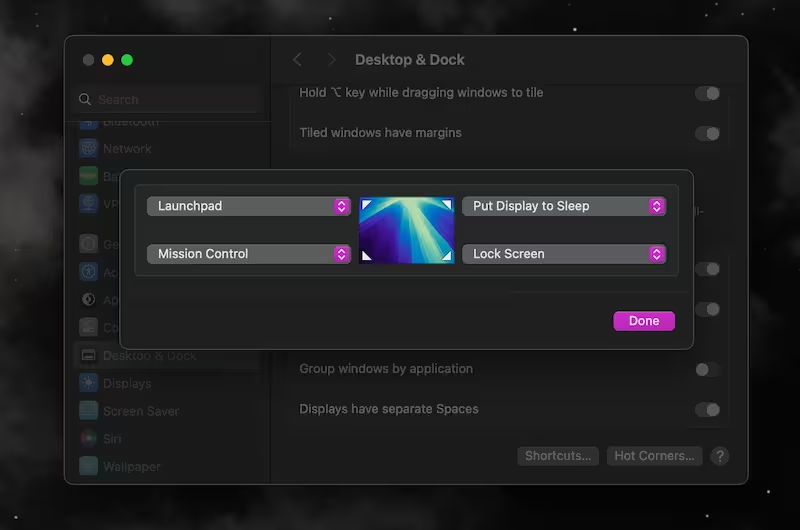
Hot Corners is a convenient Mac feature that lets you lock your screen instantly by moving your cursor to a designated corner. Here’s how to set it up:
- Open System Preferences (or System Settings on newer macOS versions)
- Click on Desktop & Screen Saver (or Desktop & Dock on newer versions)
- Click the Hot Corners button (usually in the bottom-right)
- A dialog will appear with dropdown menus for each corner of your screen
- Select one corner and set it to Start Screen Saver or Lock Screen (depending on your macOS version)
- Click OK to save your settings
Now, whenever you move your cursor to that corner, your Mac will immediately lock, providing quick privacy protection when you step away from your computer.
Tip: If you’re using a newer macOS version that doesn’t show “Lock Screen” directly, you can still achieve this by:
- Setting a corner to “Start Screen Saver”
- Going to Security & Privacy settings
- Checking “Require password immediately after sleep or screen saver begins”
This way, the screen saver activation will also lock your Mac.


