Autocorrect is a critical feature for many Android users, ensuring that typing is efficient and error-free. When it stops working, the experience can become cumbersome. The issue often stems from misconfigured settings, outdated software, or corrupted cache files.
Update Your Keyboard App
Keyboard apps, such as Gboard or SwiftKey, frequently receive updates to improve performance and fix bugs. If autocorrect has stopped working, the first step is to ensure your keyboard app is up to date. Open the Google Play Store, search for your keyboard app, and check if an update is available. Installing the latest version can resolve compatibility issues and restore autocorrect functionality.
If you’re using a pre-installed keyboard app, updates may come through system updates. Navigate to Settings > System > System Update to check for any pending updates. Keeping both your keyboard app and Android OS updated ensures optimal performance.
Verify Language Settings
Autocorrect relies on language settings to function correctly. If the language settings are incorrect or incomplete, the feature may not work as intended. Open your keyboard settings by long-pressing the comma or spacebar and selecting the gear icon. Navigate to Languages and ensure the correct language is selected and downloaded.
For multilingual users, ensure all required languages are enabled. Some keyboard apps allow you to prioritize languages, which can affect autocorrect behavior. Adjust these settings to match your typing preferences.
Clear the Keyboard App Cache
Corrupted cache files can interfere with autocorrect functionality. Clearing the cache for your keyboard app can resolve this issue. Go to Settings > Apps & Notifications, select your keyboard app, and tap Storage & Cache. Choose Clear Cache to remove temporary files without affecting your personal data.
If clearing the cache doesn’t resolve the issue, consider clearing the app’s data. This action resets the app to its default state, so you may need to reconfigure settings afterward. Be cautious, as this step will erase personalized dictionaries and preferences.
Check Autocorrect Settings
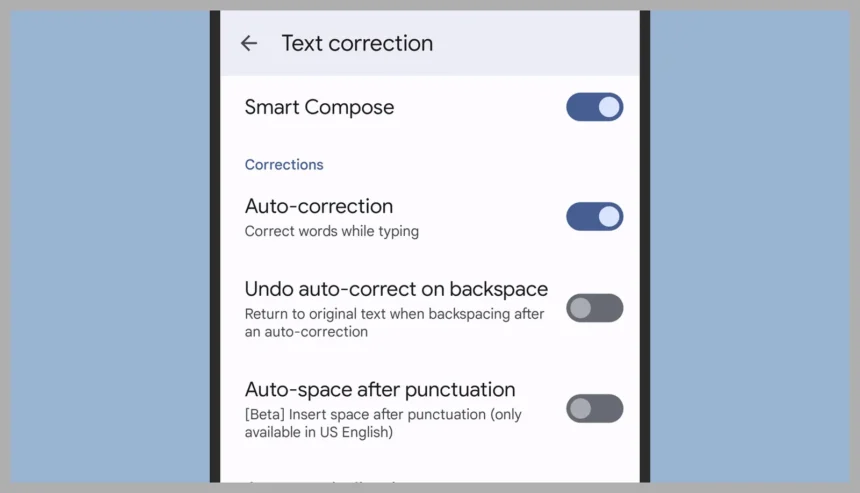
Sometimes, autocorrect may be disabled unintentionally. Open your keyboard settings and navigate to Text Correction or a similar section. Ensure that options like Auto-correction or Suggestions are enabled. Adjust the aggressiveness of autocorrect if the feature is too intrusive or not responsive enough.
For advanced users, some keyboard apps offer customization options for autocorrect behavior. Explore these settings to tailor the feature to your typing style.
Reinstall the Keyboard App
If the above steps fail, reinstalling the keyboard app may resolve persistent issues. Uninstall the app from Settings > Apps & Notifications, then reinstall it from the Google Play Store. This process ensures a clean installation, free from corrupted files or misconfigurations.
Reinstalling the app will reset all settings, so take note of any custom configurations before proceeding. After reinstallation, test autocorrect to confirm the issue is resolved.
Test Autocorrect After Each Step
After applying each fix, test autocorrect by typing in a text field. This immediate feedback helps identify which solution resolved the issue. If autocorrect still doesn’t work, proceed to the next step until functionality is restored.
By systematically addressing potential causes, you can efficiently restore autocorrect functionality and improve your typing experience on Android.


