The root user, also known as the superuser, has full control over all files, directories, and system settings on a Mac. Unlike standard user accounts, the root user bypasses most permission restrictions, making it a critical tool for advanced system administration tasks. However, this level of access also poses significant security risks if misused.
By default, macOS disables the root user to prevent unauthorized access and potential system damage.
Enabling the Root User Using Directory Utility
Directory Utility is a built-in macOS tool that allows you to manage user accounts and directory services. Here’s how to enable the root user using this method:
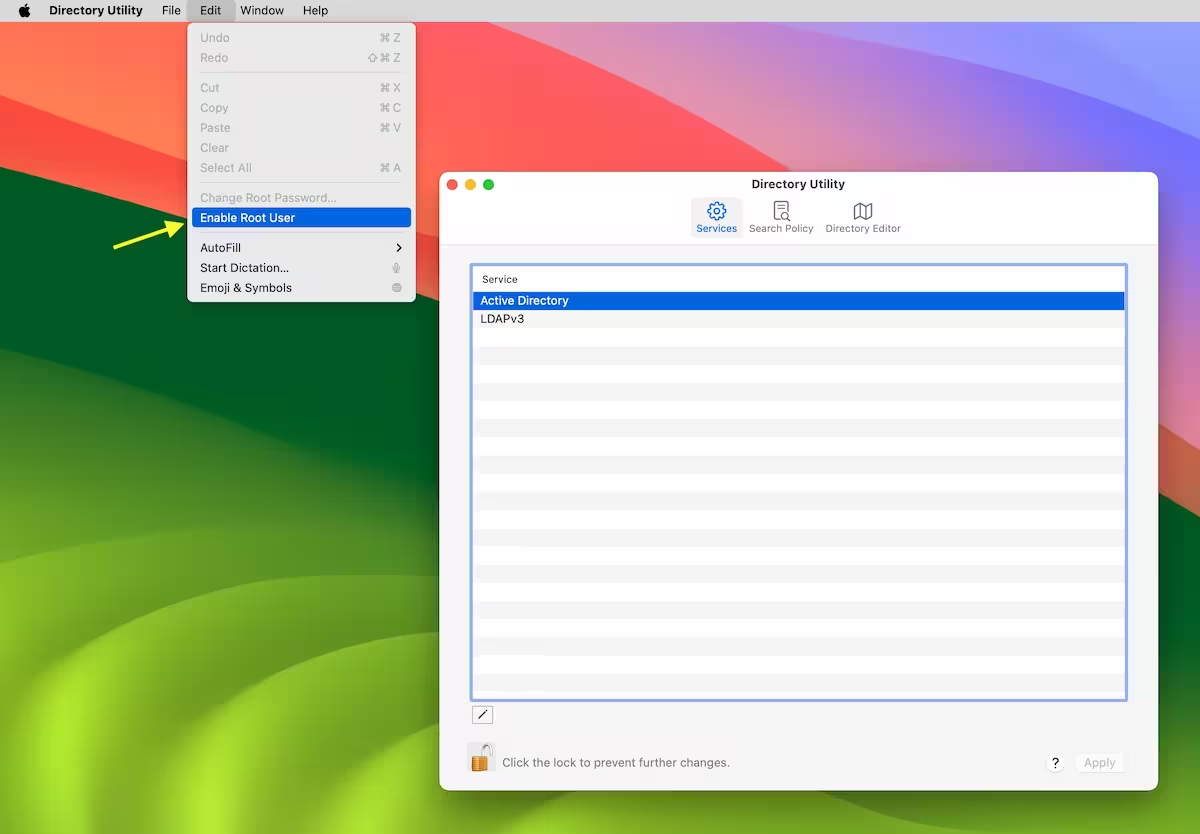
- Open Directory Utility by navigating to Applications > Utilities > Directory Utility.
- Click the lock icon in the bottom-left corner and enter your administrator credentials to unlock the settings.
- From the menu bar, select Edit > Enable Root User.
- Set a strong password for the root user when prompted. Ensure the password is unique and secure.
- Click OK to confirm. The root user is now enabled.
After enabling the root user, you can log in using the username root and the password you set. Remember to disable the root user when it is no longer needed to minimize security risks.
Enabling the Root User Using Terminal
For users comfortable with command-line interfaces, Terminal provides a faster way to enable the root user. Follow these steps:
- Open Terminal from Applications > Utilities > Terminal.
- Type the following command and press Enter:
sudo dsenableroot. - Enter your administrator password when prompted.
- Set a strong password for the root user and confirm it.
- The root user is now enabled. You can verify this by logging in with the username root.
Using Terminal is efficient but requires caution. Ensure you follow the steps precisely to avoid unintended system changes.
Security Precautions When Using the Root User
Enabling the root user introduces significant security vulnerabilities. To mitigate risks, adhere to the following precautions:
- Use a Strong Password: The root user password should be complex and unique. Avoid using common words or easily guessable patterns.
- Limit Usage: Only enable the root user when absolutely necessary. Disable it immediately after completing your tasks.
- Monitor Activity: Regularly check system logs for any unauthorized access or suspicious activity.
- Restrict Access: Ensure only trusted individuals have access to the root user credentials.
By following these guidelines, you can minimize the risks associated with enabling the root user.
Disabling the Root User
Once you no longer need the root user, it is crucial to disable it. Here’s how to do it using Directory Utility:
- Open Directory Utility from Applications > Utilities > Directory Utility.
- Unlock the settings by clicking the lock icon and entering your administrator credentials.
- From the menu bar, select Edit > Disable Root User.
- Confirm the action. The root user is now disabled.
Alternatively, you can disable the root user using Terminal with the command: sudo dsenableroot -d.
Best Practices for Root User Management
Managing the root user effectively is essential for maintaining system security. Consider the following best practices:
- Regular Audits: Periodically review system logs and user activity to detect any anomalies.
- Backup Data: Always back up critical data before performing administrative tasks as the root user.
- Educate Users: Ensure all users with access to the root account understand the associated risks and responsibilities.
By adhering to these practices, you can maintain a secure and stable system environment.


